Installing VS Code
Module 4: IDEs & Tools
Why VS Code?
So far we have written code in notebooks on Google Colab. Professional developers also use an IDE (integrated development environment): a program that combines a code editor, a terminal, a debugger and many extensions in one window. Other popular Python IDEs are PyCharm and Spyder. In this course we use Visual Studio Code (VS Code) because it is free, runs on Windows, macOS and Linux, and opens Jupyter notebooks (.ipynb) as well as plain Python scripts (.py).
- You need a laptop where you are allowed to install software. If it is managed by an organisation, install the User version (Windows) or ask your IT service.
- Install the English version of VS Code and set English as the working language. This makes it easier for classmates and instructors to help you.
- VS Code is the editor. It does not include Python. In step 2 you install Anaconda, which provides Python, the
condaenvironment manager and Jupyter support.
1. Install VS Code
Always download VS Code from the official site: code.visualstudio.com/download. Choose your operating system below.
- On the download page, choose the User Installer for Windows (64-bit for most laptops). The User version does not need administrator rights.
- Run the downloaded file (
VSCodeUserSetup-....exe) and accept the licence agreement. - On the Select Additional Tasks screen, make sure Add to PATH is ticked. We recommend also ticking the options to add the “Open with Code” actions to the Windows Explorer menu, if they are shown.
- Click Install, then Finish.
- Check the installation. Open a new terminal (search for PowerShell in the Start menu) and run:
code --versionIf you see a version number, the installation worked. If Windows says code is not recognised, close the terminal and open a new one. If it still fails, run the installer again and check that Add to PATH is ticked.
- On the download page, choose the Universal build for macOS. It works on both Apple silicon (M1 and later) and Intel Macs.
- Open the downloaded file. Drag Visual Studio Code into the Applications folder.
- Open VS Code from Applications (or Launchpad). If macOS asks whether you want to open an application downloaded from the internet, click Open.
- Add the
codecommand to the terminal. In VS Code, pressCmd+Shift+Pto open the Command Palette, type Shell Command: Install and choose the entry for thecodecommand in PATH (its full name is Shell Command: Install ‘code’ and optionally ‘copilot’ commands in PATH), then pressEnter. (The option may also offer to install the Copilot command-line tool: you do not need it for this course.) - Check the installation. Open a new Terminal window and run:
code --versionThe best way depends on your distribution.
Ubuntu, Debian and derivatives (.deb package)
- Download the
.debfile from the download page. - Open a terminal in the folder with the file and run (replace the file name with the one you downloaded):
sudo apt install ./code_*.debWhen asked whether to add the Microsoft repository, answer yes: it lets your system update VS Code automatically.
Fedora, RHEL and derivatives
sudo rpm --import https://packages.microsoft.com/keys/microsoft.asc
echo -e "[code]\nname=Visual Studio Code\nbaseurl=https://packages.microsoft.com/yumrepos/vscode\nenabled=1\nautorefresh=1\ntype=rpm-md\ngpgcheck=1\ngpgkey=https://packages.microsoft.com/keys/microsoft.asc" | sudo tee /etc/yum.repos.d/vscode.repo > /dev/null
sudo dnf check-update
sudo dnf install code
Any distribution with Snap
sudo snap install --classic codeArch Linux: install the community package visual-studio-code-bin from the AUR (see the Arch Linux wiki for how to install AUR packages).
Check the installation:
code --versionSome students prefer to work in a Linux environment inside Windows (WSL). It is optional in this course. If you choose it, install VS Code on Windows as above, then install the WSL extension (ms-vscode-remote.remote-wsl) from the Extensions view.
2. Install Anaconda (Python and Conda)
VS Code needs a Python interpreter to run your code. In this course we install it with Anaconda, which also gives us conda, the tool we use to create environments and install libraries (see Environments).
Download Anaconda Distribution from anaconda.com/download (you may be asked to register with an email) and follow the steps for your system.
- Download the Windows 64-Bit Graphical Installer and run it from your Downloads folder.
- Accept the Terms of Service and choose Just Me (Recommended).
- Choose a destination folder with no spaces or special characters in the path.
- On the options screen:
- Leave Create shortcuts ticked.
- Leave Add Anaconda3 to my PATH environment variable unticked. Anaconda does not recommend it, and you will use the Anaconda Prompt instead.
- Tick Register Anaconda3 as my default Python. This lets VS Code find it.
- Click Install, then Finish.
- Check the installation: search for Anaconda Prompt in the Start menu and open it. The prompt should start with
(base). Run:
conda --version- Download the 64-Bit (Apple silicon) Graphical Installer. To know which chip you have, open the Apple menu > About This Mac.
- Double-click the
.pkgfile and click Continue until the licence screen. Accept the Terms of Service, keep the default location and click Install. - Open a new Terminal window. The prompt should start with
(base). Run:
conda --versionIf you see command not found: conda, close and reopen the Terminal.
Anaconda stopped building installers for Intel Macs in August 2025. If your Mac has an Intel chip, ask your instructor which installer to use.
- Download the installer for your architecture (x86_64 for most laptops) from the download page. The file ends in
.sh. - Run it from the folder where it was saved (replace the file name with yours):
bash ~/Downloads/Anaconda3-*-Linux-x86_64.sh- Press
Enterto read the Terms of Service, typeyesto accept, pressEnterto accept the default folder, and typeyeswhen asked to initialise conda. - Close and reopen the terminal. The prompt should start with
(base). Check:
conda --version3. Install the extensions
VS Code is extended with small add-ons called extensions.
- Click the Extensions icon in the left bar (four squares), or press
Ctrl+Shift+X(Cmd+Shift+Xon macOS). - Search for each of these and click Install:
| Extension | Publisher | What it does |
|---|---|---|
| Python | Microsoft | Runs and debugs Python code. |
| Jupyter | Microsoft | Opens and runs .ipynb notebooks. |
| Pylance | Microsoft | Autocompletion, type information and docstrings on hover. Usually installed together with Python. |
| Ruff | Astral Software | Formats your code in a consistent (PEP 8) style. |
You can also install them from a terminal:
code --install-extension ms-python.python
code --install-extension ms-toolsai.jupyter
code --install-extension charliermarsh.ruff
Optional: format your code when you save
- In the folder you work in, create a folder named
.vscode. - Inside it, create a file named
settings.jsonwith this content:
{
  "[python]": {
    "editor.defaultFormatter": "charliermarsh.ruff",
    "editor.formatOnSave": true,
    "editor.codeActionsOnSave": {
      "source.fixAll": "explicit",
      "source.organizeImports": "explicit"
    }
  },
  "notebook.formatOnSave.enabled": true
}
Now every time you press Ctrl + S, VS Code tidies your code.
4. Your first script
Before we write code, let us name the parts of the VS Code window. You will see these words many times.
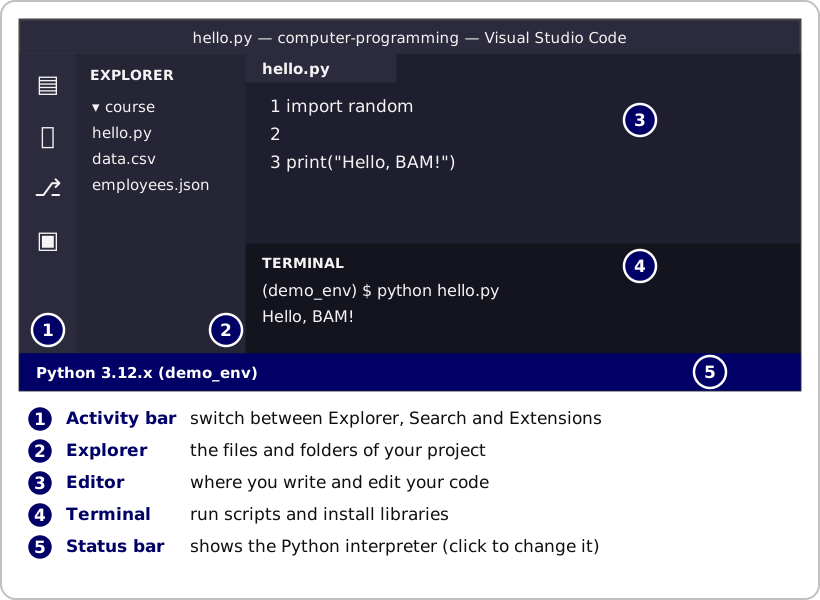
- Create a folder for the course, for example
computer-programming. - In VS Code, choose File > Open Folder… and select that folder. Click Yes, I trust the authors if VS Code asks.
- In the Explorer panel, click the New File icon and name the file
hello.py. - Type:
print("Hello, BAM!")- Click the Run Python File button (a triangle, top right) or open the terminal with
Ctrl+`and run:
python hello.pyRun this command in a terminal where the (base) environment is active. In VS Code, the integrated terminal activates it for you once the interpreter is selected.
If VS Code asks you to select an interpreter, press Ctrl + Shift + P (Cmd + Shift + P on macOS), choose Python: Select Interpreter and pick the interpreter whose name contains base or conda (the Anaconda Python from step 2).
5. Jupyter notebooks in VS Code
You can work with the same .ipynb notebooks that you use in Colab.
- Press
Ctrl+Shift+P(Cmd+Shift+Pon macOS) and run Create: New Jupyter Notebook. Alternatively, create a file with the extension.ipynb. - Click Select Kernel (top right) and choose the Anaconda interpreter from step 2 (Python Environments, then the one named
base). If VS Code offers to install theipykernelpackage, accept. You can also install it yourself withconda install ipykernel. - Write code in a cell and run it with
Shift+Enter(run and go to the next cell) orCtrl+Enter(run and stay in the cell). - Save with
Ctrl+S(Cmd+Son macOS).
If the notebook opens in Restricted Mode you cannot run cells. Choose Trust in the banner at the top.
- Create a notebook called
first_notebook.ipynbin your course folder. - In the first cell write a
print()that shows your name, and run it. - In a second cell define a function
square(x)that returnsx ** 2, and call it with7. - Create a script
hello.pythat prints the same message as in your first notebook cell, and run it from the terminal.
In the first cell of first_notebook.ipynb (replace the name with yours):
print("Ana Pérez")In the second cell:
def square(x):
    return x ** 2


square(7)
The cell shows the output 49 below it. If VS Code asks for a kernel, choose the Anaconda interpreter (see step 5).
For the script, create hello.py in the same folder with the same message:
print("Ana Pérez")Open the terminal in VS Code (Ctrl+`) and run:
python hello.pyThe terminal prints Ana Pérez. If you get can't open file, the terminal is not in the folder of hello.py: use cd to go there.
Troubleshooting
| Problem | What to try |
|---|---|
code is not recognised in the terminal |
Close the terminal and open a new one. On Windows, reinstall with Add to PATH ticked. On macOS, run Shell Command: Install ‘code’ … in PATH from the Command Palette. |
conda or python is not recognised |
On Windows, open the Anaconda Prompt from the Start menu instead of PowerShell. On macOS and Linux, close and reopen the terminal. |
| No kernel appears in the notebook | Check that the Python and Jupyter extensions are installed and that Python is installed. Run Python: Select Interpreter. |
| Cells will not run | Check whether the notebook is in Restricted Mode and trust the folder. |
Next step: environments
A conda environment is a separate space with its own Python version and libraries, so projects do not interfere with each other. In Python Environments with Conda we create one and use it in VS Code. As a preview:
conda create -n demo_env python=3.12
conda activate demo_env
conda install numpy ipykernel
Need Help?
If you have any questions, feel free to reach out via email at dprecioso@faculty.ie.edu